

Copying material from one Moodle course to another takes just a few steps and can save you lots of time. You'll use the course "Import" feature to bring the material from the original course (where it already resides) into the destination (NEW) course (where you want to add it). To copy content from one Moodle course to another, you must have editing rights in both courses. You can copy just a few items or the entire course. (This information is also available in a complete guide for your reference.)
Before you copy your prior course, verify that the number of modules is the same in the two course sites. If there are more sections in use in your original course than are available in your new destination course, materials from the extra sections will appear as "Orphaned materials" at the bottom of the course and you'll have to add sections to make them available to students—it's easier to start off with the correct number! (Having more modules in the destination course than in the original course is no problem.)
![]() Turnitin Users—If you created Turnitin assignments directly in Moodle in the original course, they will have to be deleted after you copy the course. Since Spring term 2017, we are using VeriCite assignment links for originality checking.
Turnitin Users—If you created Turnitin assignments directly in Moodle in the original course, they will have to be deleted after you copy the course. Since Spring term 2017, we are using VeriCite assignment links for originality checking.
![]() Ready? Make sure you are in your NEW empty shell, not the prior course site!
Ready? Make sure you are in your NEW empty shell, not the prior course site!
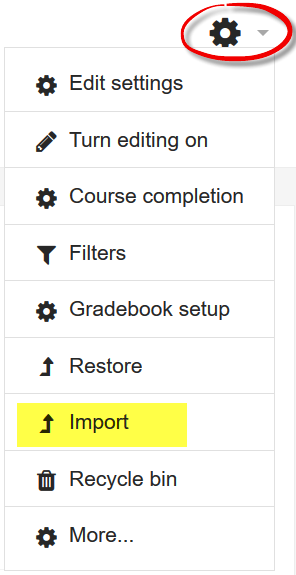
To copy your course materials:
- In the destination (NEW) course, open the Import link in the Course administration block.
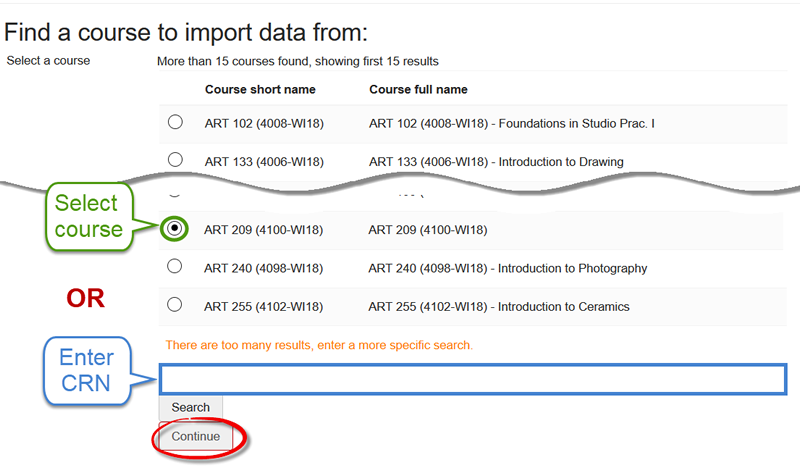
- On the course selection page, choose the course that contains the material you want to copy from the menu of courses you have taught. Note: If you do not see the course in the list, type the CRN into the search field and click on Search to locate it.
- Select the course that you want to copy and click on Continue to initiate the import process.
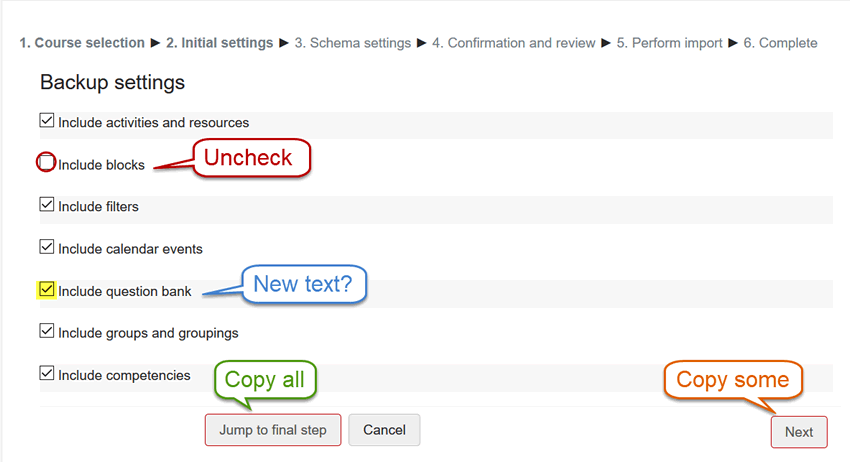
- On the Initial settings page, choose the elements that you want to copy into your course.
- Uncheck the option to Include blocks to ensure that the most current version of the blocks is available to your students.
- Important Note: You can copy an existing course without copying over the test banks that it contains. If you intend to upload a new set of test banks, be sure to uncheck the Include test bank option.
- Click on Jump to final step if you wish to copy everything in the prior course. If you do so, once the import process is complete, you'll see a confirmation notice. Click on Continue to return to your course. Be sure to 1) delete any extra "Announcements" links (save the topmost link), and 2) delete any Turnitin assignments copied over from the prior course.
- To select specific items only for use in the new term, click on Next to continue.
- On the Schema settings page, review the course contents listed by module that have been pre-selected for you to copy into the destination course.
- Deselect the Announcements link to avoid creating a duplicate link in your destination course.
- Deselect any Turnitin assignment links—you'll need to create VeriCite links in your destination course site.
- If you do not intend to copy the entire course, you might find it easier to click on the link for None at the top of the page by "Select," and then select specific items that you wish to copy into your destination course. Click on the box adjacent to the section where the items are located, then check the box adjacent to each item you wish to copy over.
- When you have identified all of the elements that you want to copy into the destination course site, click on Next.
- On the Confirmation and review page, review the elements that you've selected to copy. If you are satisfied with your choices, click on Perform import to complete the import process. To make changes in your selections, click on Previous.
- When the import process is complete, you'll see a confirmation notice. Click on Continue to return to your course.
Oops! Occasionally, courses get imported more than once into a course shell (the record so far is four times!) or the wrong course gets imported. Send a message to the Center for Instructional Support including the offending CRN and we'll be happy to remove everything so you can start over.
After you've returned to your newly outfitted course:
- Review the entire course, including the grade book and test questions.
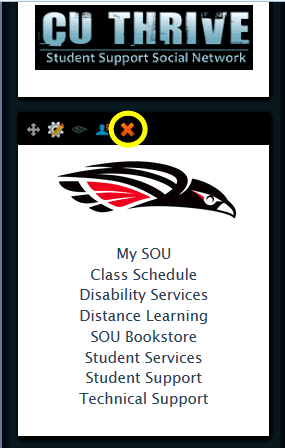
- If you have any duplicate "Announcements" links, be sure to clean them up. Likewise, check to make sure you don't have any duplicate blocks in the right column—the SOU resource block shown here contains numerous broken links due to changes made by the campus webmaster and we no longer participate in the CU Thrive program, for instance. Hover over the top margin of a block to display the delete icon and click on it to remove the surplus block (see image above). Be sure to delete any blocks containing links for My SOU or CU Thrive as these are obsolete.
- Make sure all items display properly and have the correct settings. Be sure to look for and repair broken links.
- Note that items that were marked as "hidden" in the prior course site may now be visible.
- Update settings for due dates on assignments and quizzes—don't forget to update the year! TIME-SAVER TIP: Use the new "Dates" tool to update all quiz and assignment links quickly and easily. Open the admin gear, click on More…, then click on Dates in the Reports area.
- Create VeriCite assignment links for any Turnitin assignments included in the prior edition of the course. (You can copy and paste descriptions from the previous course site.)
- Update your syllabus and other files, and repost them as needed.
Voilà! You're all set.
Add a comment
Please log in to submit a comment.