

This article will show you how to back up your computer's local user profile, which is stored on your computer's hard drive, to either your P: drive, Google Drive, or an external device such as a USB flash drive or external hard drive. Instructions are included for both Windows and Macintosh. If you have questions about these procedures or run into difficulties executing them, contact your Computing Coordinator.
P: Drive
Step 1 - Locate Your User Profile
Windows
To locate your local user profile, open File Explorer on your computer, type %userprofile% into the path bar, and press Enter. You can launch File Explorer by pressing Windows Key + E on your keyboard, which works for all versions of Windows.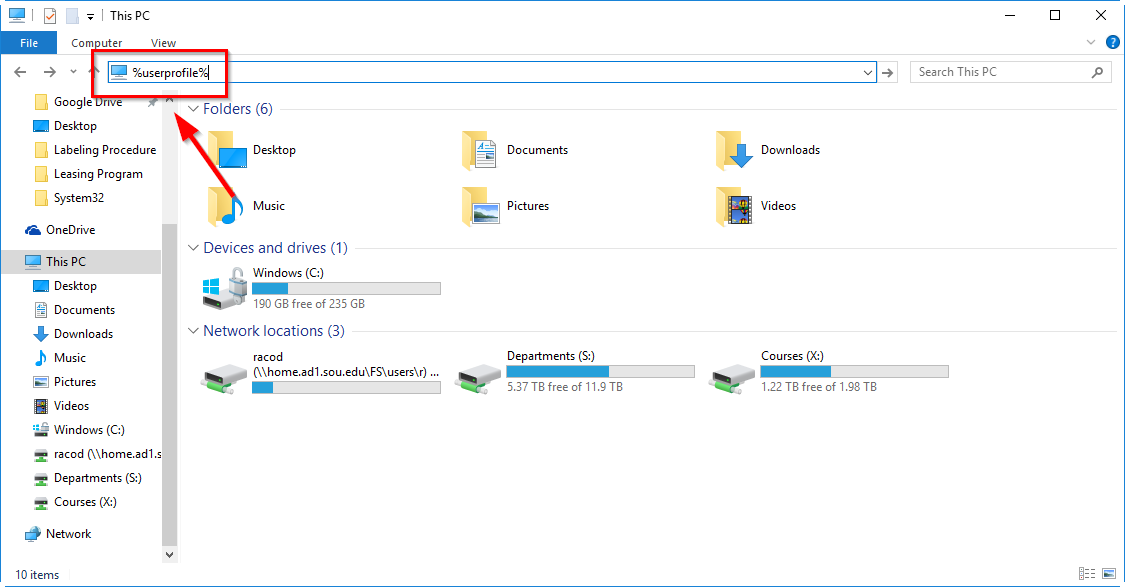
Macintosh
With Finder selected (click anywhere on your desktop), click on Go in the menu bar along the top of the screen and then select Home from the dropdown menu to access your local user profile, or use the keyboard shortcut Shift + Command + H.

Step 2 - Select the Folders to Back Up
Windows
After you have navigated to your local user profile (look for your username in the path bar), you will want to select the subfolders to back up by holding Ctrl on your keyboard and left-clicking each folder you want. You can also drag and select all of the folders if you want. At a minimum, we recommend that you select:
- Desktop
- Documents
- Downloads
After you have selected the folders you want to back up, you need to copy them to your computer's clipboard by pressing Ctrl + C on your keyboard or by right-clicking on any of the selected folders and selecting Copy from the menu.
Macintosh
Confirm that you are in your home folder by looking for you username next to a small house icon in the top-center of the Finder window. You should then select the subfolders you want to back up by holding Command on your keyboard and left-clicking on the folders individually. At a minimum, we recommend that you select:
- Desktop
- Documents
- Downloads
After you have selected the folders you want to back up, you need to copy them to your computer's clipboard by pressing Command + C on your keyboard. You can also copy the folders by holding Ctrl on your keyboard, left-clicking on any of the selected folders, and then selecting "Copy X Items" from the menu, where X will be replaced by a count of the folders you have selected.

Step 3 - Create a Backup Folder on Your P: Drive
Windows
Now that you have copied the folders you want to back up, you need to create a new folder on your P: drive to hold them. You can do this by navigating to your P: drive and pressing Ctrl + Shift + N on your keyboard. Name the folder something descriptive and then press Enter to lock in the name.
Macintosh
Follow these instructions to connect to your P: drive, then create a new folder there by clicking on File in the menu bar, then selecting New Folder. You can also use the keyboard shortcut Shift + Command + N.

After creating the folder, select navigate down into it by double-clicking on its icon.

Step 4 - Initiate the Transfer
Windows
After creating a backup folder on your P: drive, enter it and paste in your copied folders from your user profile by pressing Ctrl + V on your keyboard or by right-clicking in the whitespace and selecting Paste from the menu. Please be patient while the files transfer, as it may take a while depending on how much data you need to copy. If you encounter errors or run out of space on your P: drive, contact your Computing Coordinator for assistance or try another backup method.
Macintosh
To initiate the transfer once you're in your backup folder, press Command + V on your keyboard or Ctrl + Left-click anywhere in the folder and then select Paste Items from the menu or click on the Edit item in the menu bar and select Paste Items from its menu. Please be patient while the files transfer, as it may take a while depending on how much data you need to copy. If you encounter errors or run out of space on your P: drive, contact your Computing Coordinator for assistance or try another backup method.

Step 5 - Verify
Windows
After the transfer completes, you should take a moment to ensure that you copied everything you meant to copy by looking through the folders that were just created in your P: drive's backup folder. If something is missing, you can either repeat the backup process from Step 1 or you can contact your Computing Coordinator for assistance.
Macintosh
After the transfer completes, you should take a moment to ensure that you copied everything you meant to copy by looking through the folders that were just created in your P: drive's backup folder. If something is missing, you can either repeat the backup process from Step 1 or you can contact your Computing Coordinator for assistance.

Google Drive
Please perform the following steps in the Google Chrome web browser. As of November 2016, it is the only web browser that supports dragging and dropping entire folders into Google Drive. If you do not have Chrome installed on your computer, you can download it here.
The following instructions are identical for Windows and Macintosh.
Step 1 - Log in to Your SOU Email
You can get there directly by tying http://mail.g.sou.edu into your web browser's address bar.
Step 2 - Access Google Drive
From your inbox, look for the speed dial icon in the top-right corner of the screen, click it, and then click on the Google Drive icon.
Step 3 - Create a Backup Folder in Google Drive
Click on the blue New button in the top-left corner of the Google Drive screen and select Folder from the dropdown menu. When prompted, enter a descriptive name for the folder and then press the Create button or press Enter on your keyboard.

Step 4 - Upload Your Files
After you have created a backup folder in your Google Drive, enter it by finding it in your list of folders and double-clicking it. Alternatively, you can select it with a single click and then press Enter. Once inside the folder, you should see a blank grey area with a message about dragging and dropping files. This is the preferred method of uploading your user profile folders to Google Drive.
To get stared, refer back to Step 1 and Step 2 from the P: drive instructions, as you will want to navigate to your user profile and select the folders you wish to transfer. We recommend that you do this in a File Explorer or Finder window that is smaller than the full size of your screen, as this will make it easy to drag and drop the files. Once you've selected the folders you want to transfer to Google Drive, move the File Explorer or Finder window off to the side slightly so that you can click and drag any one of the selected folders over to the Google Drive window, which will bring all of them over. Refer to the screenshots below.
Windows

Macintosh

After dragging and dropping your files, a small progress window will pop up in the bottom-right corner of your screen so that you can track your file uploads. Please be patient as the upload could take a while depending on how much data you're backing up.
Step 5 - Verify
After your files are finished uploading, please take a moment to review the contents of your backup to ensure that you copied everything you need.
External Storage
Windows
You will find your external storage device in your list of drives within File Explorer after connecting the device to your computer. You may have to manually select the This PC view if File Explorer doesn't automatically take you there. You can either find it in the shortcut bar on the left of the screen or you can type in "This PC" in the path bar and press Enter. Please refer to the screenshot below.
Please refer back to the P: drive instructions if you need a refresher on how to find your user profile, copy the folders you want to back up to the clipboard, and then paste them into another location. The only difference is this time you will be pasting into a folder on your external device instead of using a folder on your P: drive. 
When you're finished backing up your data to your external device, be sure to eject it properly by right-clicking on its icon in This PC and selecting Eject. You will receive a notification when Windows is done ejecting the drive, which usually appears in the bottom-right area of the screen. If you don't see the message within a few seconds, or if you receive a message stating that the drive is still in use, try closing all programs and attempt to eject the drive again. If it still won't let you eject it, we recommend that you shut down the computer and then remove the drive while the power is off.

Macintosh
You will find your external storage device in your list of drives within the Computer Finder window or on your desktop after connecting the device to your computer. Please refer back to the P: drive instructions if you need a refresher on how to access the Computer Finder window or how to turn on the option to display connected drives on your desktop. You can also refer back to those instructions to help you find your user profile, copy the folders you want to back up to the clipboard, and then paste them into another location. The only difference is this time you will be pasting into a folder on your external device instead of using a folder on your P: drive.


When you're finished backing up your data to your external device, be sure to eject it properly by holding Ctrl and clicking on its icon in either the Computer window or on your desktop and then select Eject "<Name of Device>". The drive icon will turn transparent and then disappear within a few seconds if the ejection is successful. If that doesn't happen, or if you receive a message stating that the drive is still in use, try closing all programs and attempt to eject the drive again. If it still won't let you eject it, we recommend that you shut down the computer and then remove the drive while the power is off.

Add a comment
Please log in to submit a comment.